Microsoft Word can automatically create a table of contents (TOC) based on the headings in your document. To use this feature, you first need to apply Word’s built-in heading styles to the headings and subheadings in your document.
To create headings, select the text, go to the Home tab, and choose the appropriate heading style from the Styles group. For example, use Heading 1 for main headings, Heading 2 for subheadings, and so on.
Once you've finished creating headings, follow these steps to insert a table of contents into your Word document.
- In your Word document, place the cursor where you want to insert the table of contents.
- Switch to the References tab.
- Click Table of Contents.
- Select Automatic Table 1 or Automatic Table 2 from the menu.

Word will create and insert the table of contents at the specified location. You can then navigate to a heading quickly by holding the CTRL key and clicking on the entry you want to jump to.
If you want to remove the table of contents from your document, simply go to References > Table of Contents and select Remove Table of Contents.
While Word makes it easy to create TOCs, it doesn't automatically update them when you edit headings or move them to different pages. Fortunately, updating the table of contents manually is straightforward. Here's how to do it:
- Click anywhere within the table of contents to select it.
- Click the Update Table button that appears.
- Choose Update page numbers only if you have only made changes that affect the page numbers.
- Select Update entire table if you want to update the entire table of contents, including the headings.
- Hit OK to confirm.

Your table of contents will now be updated to reflect the latest changes in your Word document.
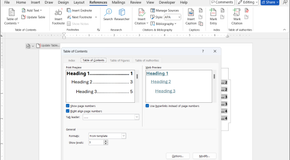
If Word's default table of contents feels too plain, don't worry. Word offers several customization options to help you tailor it to match your document's design. Here's how you can make your table of contents more visually appealing:
- In your Word document, go to the References tab.
- Click Table of Contents and select Custom Table of Contents.
- In the Print Preview section, use the checkboxes to show or hide page numbers and adjust the alignment. You can also change the pattern style between the heading title and the page number.
- Under the General section, you can select from predefined styles and specify the number of heading levels you want to display in your TOC.
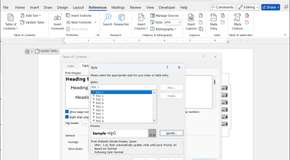
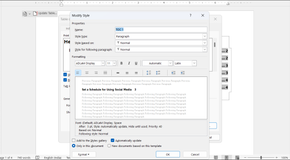
- Click Modify to change the appearance of items in the table of contents. In the Styles list, select the level you want to change, and then click Modify to change the font, size, color, format, and more.
- Once you’re done making the changes, click OK.


You can be as creative as you like while modifying the table of contents. If you need inspiration, check out these table of contents template examples for Microsoft Word. If customizing the table of contents manually seems like a lot of work, you can also download free, ready-made templates from the web.
Whether you choose to create a table of contents manually or use a template, it shouldn't take much time once you become familiar with the process.
Source: https://www.makeuseof.com/insert-table-of-contents-word/?utm_medium=newsletter&utm_campaign=MUO-202506100800&utm_source=MUO-NL&user=amltLm5hZ3kyQGdtYWlsLmNvbQ&lctg=02f46df6687a5c6b6c6a51453f460af32dc1bbe4d7321e3d7b193ec97761583e