Monday, September 11, 2023

How to Add a Drop-Down List to a Cell in Excel


Drop-down lists are very useful data entry tools we see just about everywhere, and you can add custom drop-down lists to your own Excel worksheets. It’s easy and we’ll show you how.
Drop-down lists make it easier and more efficient to enter data into your spreadsheets. Simply click the arrow and select an option. You can add drop-down lists to cells in Excel containing options such as Yes and No, Male and Female, or any other custom list of options.
It’s easy to add a drop-down list to a cell in Excel, but the process is not intuitive. Drop-down lists are created using the Data Validation feature. We’re going to create a drop-down list with a selection of age ranges to show you how it’s done.
To begin, enter the list of age ranges into sequential cells down a column or across a row. We entered our age ranges into cells A9 through A13 on the same worksheet, as shown below. You can also add your list of options to a different worksheet in the same workbook.


01_entering_items_for_drop_down_list


Now, we’re going to name our range of cells to make it easier to add them to the drop-down list. To do this, select all the cells containing the drop-down list items and then enter a name for the cell range into the Name box above the grid. We named our cell range Age.


02_naming_cell_range


Now, select the cell into which you want to add a drop-down list and click the “Data” tab.


03_clicking_data_tab


In the Data Tools section of the Data tab, click the “Data Validation” button.


04_clicking_data_validation


The Data Validation dialog box displays. On the Settings tab, select “List” from the Allow drop-down list (see, drop-down lists are everywhere!).


05_selecting_list_from_allow


Now, we’re going to use the name we assigned to the range of cells containing the options for our drop-down list. Enter =Age in the “Source” box (if you named your cell range something else, replace “Age” with that name). Make sure the “In-cell dropdown” box is checked.
The “Ignore blank” check box is checked by default. This means that the user can select the cell and then deselect the cell without selecting an item. If you want to require the user to select an option from the drop-down list, uncheck the Ignore blank check box.


06_entering_source


You can add a popup message that displays when the cell containing the drop-down list is selected. To do this, click the “Input Message” tab on the Data Validation dialog box. Make sure the “Show input message when the cell is selected” box is checked. Enter a Title and an Input message and then click the “OK” button.


07_entering_input_message


When the cell containing the drop-down list is selected, you’ll see a down arrow button to the right of the cell. If you added an input message, it displays below the cell. The down arrow button only displays when the cell is selected.


08_drop_down_list_in_cell


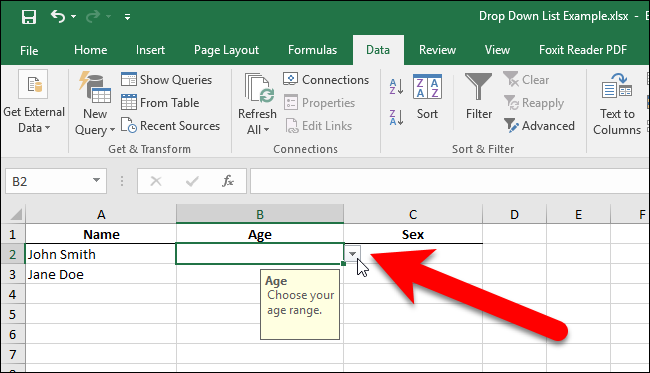
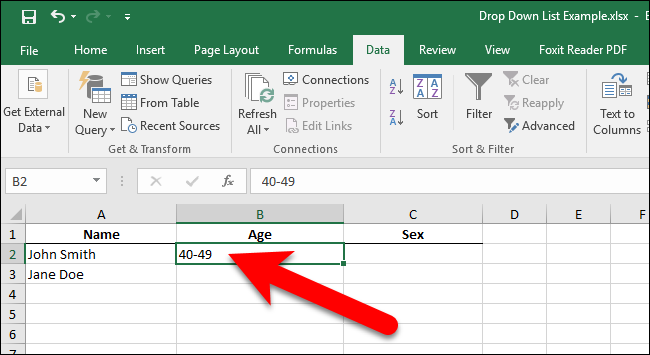
Click the down arrow button to drop down the list of options and select one.


09_selecting_an_option


If you decide you want to remove the drop-down list from the cell, open the Data Validation dialog box as described earlier and click the “Clear All” button, which is available no matter which tab is selected on the dialog box.


10_clearing_drop_down_list


The options on the Data Validation dialog box are reset to their defaults. Click “OK” to remove the drop-down list and restore the cell to its default format.


11_clicking_ok_after_clearing


If there was an option selected when you removed the drop-down list, the cell is populated with the value of that option.


12_selected_option_in_cell_after_clearing


Source: https://www.howtogeek.com/290104/how-to-add-a-drop-down-list-to-a-cell-in-excel/

Monday, April 3, 2023

How to Compare Two Columns in Excel: 7 Methods

 When working with large Excel spreadsheets, comparing the data from two columns can be time-consuming. Instead of analyzing the columns and writing “Match” or “Mismatch” into a separate column, you can use Excel’s functions to streamline the process.

We’ll take a look at how to use different Excel functions to compare two columns and identify matching or mismatching data.

1. How to Highlight Duplicate Data

If you want to compare two columns in Excel, but don’t want to add a third column showing if the data exists in both columns, you can use the Conditional formatting feature.

  1. Select the data cells you want to compare.
  2. Head to the Home tab.
  3. From the Styles group, open the Conditional Formatting menu.
  4. Click Highlight Cells Rules > Duplicate Values.
     
    5. In the Duplicate Values window, make sure the Format cells that contain option is set to Duplicate and choose the formatting option next to values with.
  5. Click OK.

Excel will now highlight the names that are present in both columns.

2. How to Highlight Unique Data

You can use the same function if you want to identify data that isn’t part of both columns.

  1. Select the data set.
  2. Once again, head to Home > Conditional Formatting > Highlight Cells Rules > Duplicate Values.
  3. For Format cells that contain, choose Unique.
  4. Select how the mismatched data should be highlighted and click OK.

Excel will now highlight the names that can be found only in one of the two columns.

 
While these methods are quite easy to use, they might not be efficient for larger spreadsheets, so you’ll have to take think about an efficient way to organize your spreadsheet. So we’ll take a look at more complex solutions that show you which rows have the same data or use an additional column to display values indicating if the data matches or not.

3. Highlight Rows With Identical Data

If you need a better visual representation of identical data, you can make Excel find matching values in two columns and highlight the rows with matching data. As we did on the previous method, we’ll use the Conditional formatting feature, but will add a few extra steps.

This way, you will have a visual indicator that will help you identify matching data faster than reading through a separate column. Follow these steps to use Excel’s conditional formatting to compare two sets of data:

  1. Select the data you want to compare (don’t include the headers) and open the Home tab.
  2. Click Conditional Formatting and select New Rule.
  3. From Select a Rule Type, click Use a formula to determine which cells to format.
  4. Enter =$A2=$B2 into the field below Format values where this formula is true. Here, A and B correspond to the two columns we are comparing.
     
    5. To customize how Excel will highlight the rows, click Format, and in the Format cells window, select the Fill tab. You can choose the background color, pattern style, and pattern color. You will get a sample, so you can preview the design. Click OK once you’ve completed the customization process.

  5. Click OK in the New Formatting Rule window, so Excel will highlight the rows with matching data instantly.
 
When comparing two columns in Excel using this method, you can also highlight the rows with different data. Go through the above steps, and at step 5, enter the =$A2<>$B2 formula within the Format values where this formula is true field.

4. Identify Matches With TRUE or FALSE

You can add a new column when comparing two Excel columns. Using this method, you will add a third column that will display TRUE if the data matches and FALSE if the data doesn’t match.

For the third column, use the =A2=B2 formula to compare the first two columns. If you think your spreadsheet will look too crowded with the TRUE and FALSE rows, you can set a filter in Excel, so it will only show the TRUE values.

5. Compare Two Columns With an IF Function

A different method to analyze Excel data from two columns is to use an IF function. This is similar to the above method, but it comes with the advantage that you can customize the displayed value.

Instead of having the TRUE or FALSE values, you can set the value for matching or different data. For this example, we’ll use the Data matches and Data doesn’t match values.

The formula we’ll use for the column showing the results is =IF(A2=B2,"Data Matches","Data Doesn’t Match").

6. Compare Two Columns With a VLOOKUP Function and Find Matching Data

Another way to have Excel find duplicates in two columns is to use a VLOOKUP function. Excel will compare each cell in the second column against the cells in the first column.

Use the =VLOOKUP(B2,$A$2:$A$14,1,0) for the column displaying the results. Just make sure you adjust the data range.

 
When using this formula, Excel will display the matching data or use a #N/A value. However, the #N/Avalue might be confusing, especially if you send the spreadsheet to someone else. If they are not experienced when it comes to Excel, they could believe there’s a mistake.


So to avoid any confusion, upgrade the VLOOKUP function to an IFERROR function. If you need to find data that is in column B and is also in column A, use the =IFERROR(VLOOKUP(B2,$A$2:$A$14,1,0),"Data Doesn't Match") formula.

This is just an example of a VLOOKUP function that you could use to search spreadsheets efficiently.

7. How to Compare Two Columns and Extract Data

Besides comparing two Excel columns for matches, you can also use the VLOOKUP function to extract matching data. This will save you time as you don’t have to manually go through the first column and search for relevant data.

Also, if data in the second column misses from the first column, Excel will display a #N/A value. For this, use the =VLOOKUP(D2,$A$2:$B$14,2,0) formula.

 
Note: If you want to protect your results from spelling mistakes, use the =VLOOKUP("*"&D2&"*",$A$2:$B$14,2,0) formula. Here, the asterisk (*) has the role of a wild card character, replacing any number of characters. This is just one of the ways you could use a wild card for better results in Excel

Compare Excel Columns With Ease

As we’ve discussed, there are plenty of ways and tricks you can use to compare two columns in an Excel spreadsheet and get the best results. You can even add a third column to display the results. You can even use Excel to compare physical documents, as you can quickly import data in Excel with its built-in tools.

Source: https://www.makeuseof.com/search/?q=How+to+Compare+Two+Columns+in+Excel%3A+7+Methods